Working with printed catalogues
Different methods allow to reproduce a pattern with GroundForge.
Recognize patterns
The catalogue pages are the easiest way to start experimenting with grounds.
The generated pair diagrams don’t care about plaits and something-pin-something and draw them as plain cloth stitches. Furthermore, the distances between stitches are optimized to some average. So when trying to start with some familiar pattern to make variations, you may have to simplify, mirror and distort it to recognize it in the TesseLace Index or match up with the encoding system of GroundForge.
Let us illustrate the process with an example:

- left: the desired pattern (pattern 3086 of “Gründe mit System” by Uta Ulrich, 4F in mrs Whiting index)
- 2nd: simplified something-pin-something to plain stitches
- 3rd: snapping stitches to grid positions
- 4th: a partially squeezed version also snapping to grid positions
- top right: the matching pattern from the TesseLace Index
- bottom right: a flipped version of the stitches on the droste page also matches
Snapping to a rectangular grid might not help to recognize the corresponding pattern in the index. See also the trick with colors on the Reshape Patterns page, we’ll get back to snapping further down the page.
Simplifying stitches might need some out of the box thinking as shown with the Binche snow-flakes under tiling
Matrix from pair diagram
The template below contains objects to assemble a matrix required for the parameters. Each object represents a stitch and the pairs used to make the stitch.
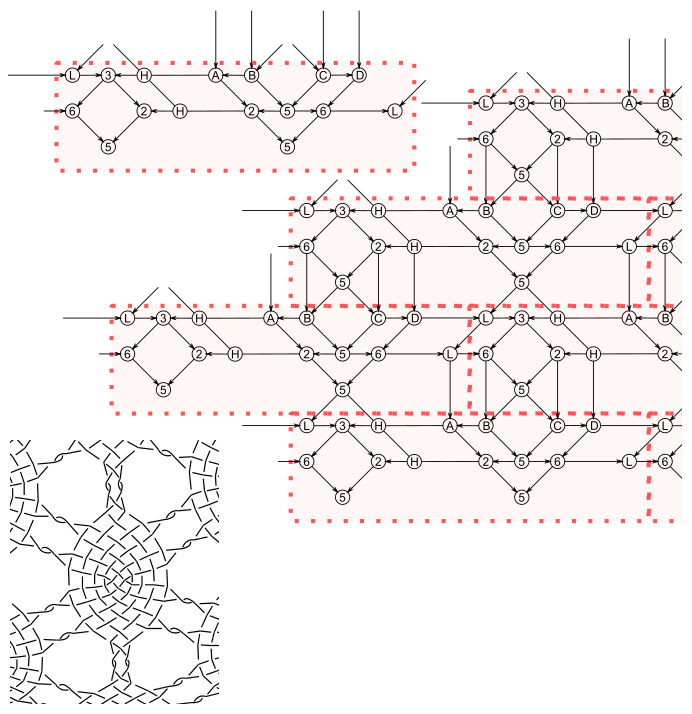
Start with the simplifications and distortions as described under Recognize patterns. The snapped versions of the example happen to abide the rules for a valid matrix: diagonal connections span just one square, horizontal and vertical span one or two squares. Lookup the digits or letters from the template and fill them in on the adjusted diagram. You might need more repeats than expected to figure out a tiling.

Tiling
The next step is figuring out the tiling. GroundForge uses only rectangular tiles, that might not match the natural repeat of a pattern. The tiles in the example are surrounded with a red-dotted line and stacked as bricks in a wall. An alternative stacking method looks like a checker board though the tiles can be rectangles. Finally read the matrix from the symbols within one tile. Note that empty spots require a dash as shown on choose stitches, it would get confusing with this example.
To see if it is possible to reduce a rectangular tile to bricks, divide the rectangle in four quadrants. If the upper left equals the lower right and the upper right equals bottom left, you can use the top half or bottom half as brick tile. It saves IDs of stitches to assign.

With an SVG editor
You can also use a general purpose editor like Adobe-Illustrator, CorelDraw or the free InkScape and the SVG version (right click to download) of the template.

The symbol in each template object has six free snapping points,
two of them should be connected with other objects.
Copy-paste these objects to assemble a pattern without changing the length or directions of lines connecting the symbols. It might need some out-of-the-box thinking: the Binche snow flake example above has horizontal connections and the vertical connection is reduced to a single stitch. Stretching the stitch into a kind of plait with a hole (ctcttctc) reveals traditional connections in the thread diagram.
Droste method
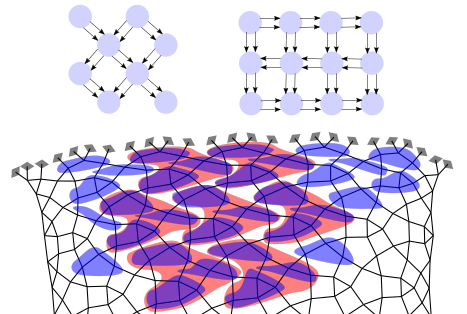
The Droste method uses thread diagrams as pair diagram.
The image below tries to show how to dissect a pair diagram as if it is a thread diagram. The blue shapes enclose stitches with two pairs alias threads. The red shapes collect stitches into a repeat with three rows of the diagonal base pattern, its matrix:
5-
-5
5-
The weaving base pattern has always a checkerboard tiling. The diagonal base pattern needs a brick tiling with an odd number of rows and a checkeboard tiling with an even number of rows.
